

If you search "pinterest blogging" on Google right now, you will find the same recycled advice everywhere: create an account, make a board, design a pin in Canva, start posting. Nobody tells you the part that actually moves the needle. How do you take one published blog post and turn it into a small traffic machine? How many pins per post, what goes on the image, what exactly do you write in the title and description, which board gets the pin first, how do you track the link, and which tools make the whole thing repeatable?
I learned this the slow way, by testing pin after pin and watching which ones sent real readers and which ones sat at zero impressions. This guide is the complete system I use now. Every new blog post gets the same treatment: keyword angles, two purpose-built pins, a board strategy, optimized titles and descriptions, tracked links, and a design process that takes minutes with the right tools. Follow it and Pinterest stops being a chore you "should do" and becomes the most reliable free traffic source your blog has.
Why Pinterest Blogging Still Works in 2026
Pinterest is not social media. It is a visual search engine, and that one distinction explains everything. On Instagram or TikTok, your post lives for a day or two and then dies in the feed. On Pinterest, people actively search for solutions with buying and learning intent, and a good pin keeps working for months or even years after you publish it. Pinterest reports over 578 million monthly users as of its Q2 2025 data, and those users are planners. They search "budget bedroom ideas" or "online earning in Pakistan" weeks before they act, which makes them exactly the readers a blogger wants.
For a blog, this creates a compounding effect that no other free channel offers. One blog post, paired with two or three well-made pins, can bring you a steady trickle of readers long after you have moved on to the next article. And because Pinterest pins get indexed by Google too, your profile and boards can show up in Google search results, which is free visibility on top of free visibility.
The System: What Happens After You Hit Publish
Here is the workflow in one paragraph, then I will break every step down. After publishing a blog post, you research 2 to 3 keyword angles for it on Pinterest itself, design 2 pins (different angles, different designs), write a keyword-rich title and description for each, add topic tags, link each pin to the post URL with tracking parameters, save the first pin to your most relevant topic board and the second to the same board a few days later, then cross-save both to your main blog board. That is it. The same repeatable system, every post, every time.
Notice what is not in the system: pinning the same image ten times, making a board for every single post, or copying your Instagram caption into the description box. Those are the habits that keep most bloggers invisible on Pinterest.
Step 1: Find Your 2 to 3 Keyword Angles Before Designing Anything
Most bloggers design the pin first and think about keywords later. Experts do the opposite. A pin is a search result, so its title and description need to match what people actually type into the Pinterest search bar.
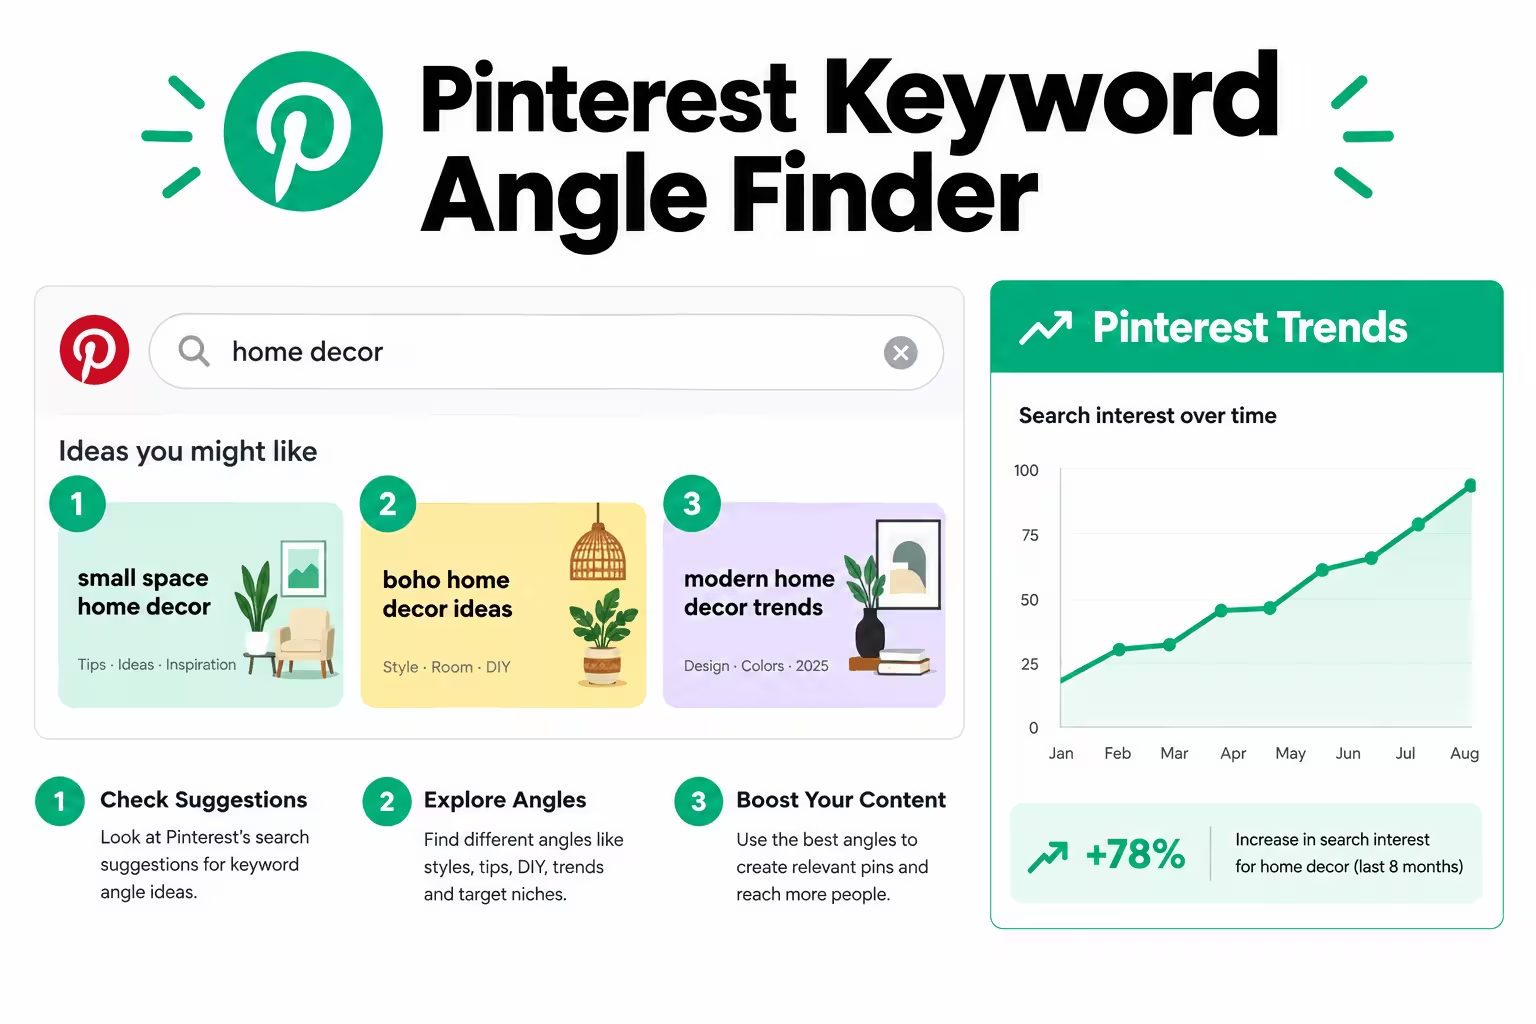
Open Pinterest and type your post's topic into the search bar. Do not press enter. The suggestions that appear, those colored tiles, are real searches from real users, ordered by popularity. For a post about earning from home, you might see "earn money from home for students," "online earning without investment," and "work from home ideas." Each suggestion is one pin angle. Pick the 2 to 3 that best match sections of your article.
Then open Pinterest Trends, Pinterest's free trend tool, and check those phrases for your target region. If one angle is rising and another is flat, you know which pin to push first. This five-minute research step is the single biggest difference between pins that get impressions and pins that get nothing. Your pin is now built on demand instead of guesswork.
Step 2: The Board Strategy (And Why You Should NOT Make a Board Per Post)
This is where I correct a mistake I see constantly, and honestly, one I made myself at the start. It feels logical to create a board for every blog post and drop that post's pins inside it. Do not do it. You end up with 40 boards that each contain 2 pins. Those thin boards tell Pinterest nothing about what you are an authority on, and a profile full of near-empty boards looks abandoned to visitors.
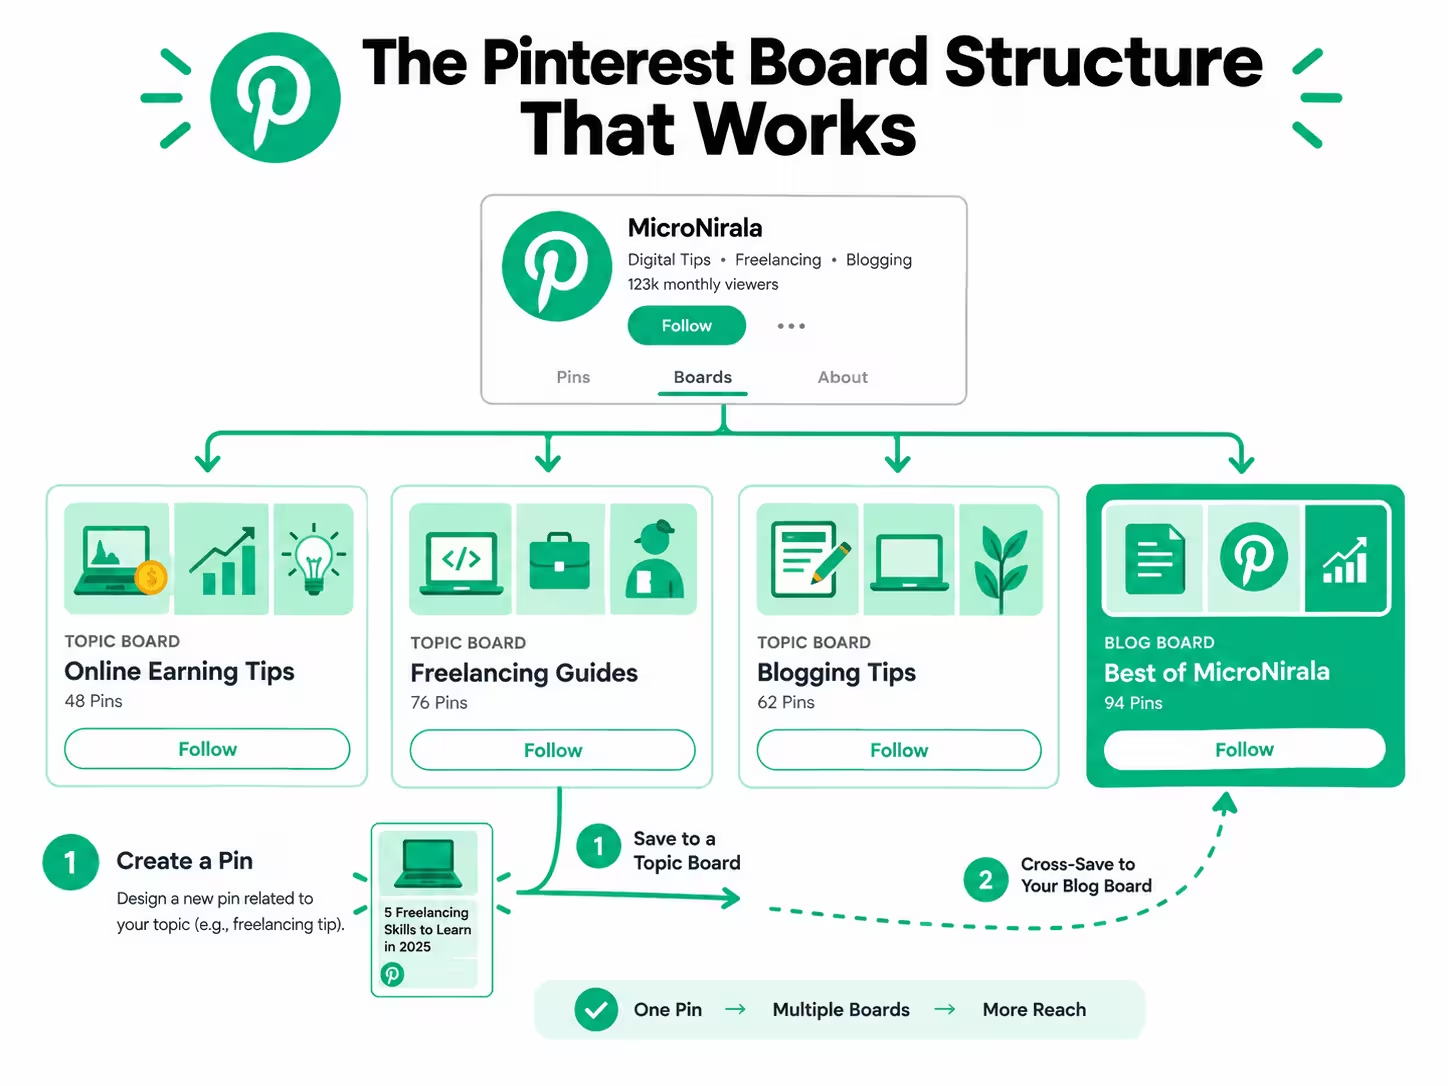
Here is what works instead. Create one board per blog category or topic cluster, named with plain search keywords, plus one main blog board that holds everything you publish.
- Topic boards, one per category: name them exactly how people search. "Online Earning Tips," "Freelancing Guides for Beginners," "Blogging for New Bloggers." Not cute names, keyword names.
- One blog board for your whole site: something like "MicroNirala Blog" or "Best of MicroNirala." This is your portfolio board, the place a new follower checks to see everything you publish.
- Every board gets a keyword-rich description, 1 to 2 sentences saying what the board is about and who it helps, plus a clean cover image. Arrange your boards so the blog board and your strongest topic boards sit at the top of your profile.
The pinning order matters. Always save a new pin to the most relevant topic board first, then cross-save it to your blog board afterward. Pinterest reads the first board as the pin's topic signal. Pin to the topic board, let it index, then add it to the blog board a day or two later. That order is a small detail with an outsized effect.
Step 3: Design 2 Pins Per Post (The 2-Pin Rule)
One post, two pins. Not one, not ten. Two. Here is why two is the magic number. Pinterest's algorithm rewards fresh pins, meaning new images, even when they link to the same URL. Two fresh images pointing at the same article give you two chances to rank in search, two chances to appear in feeds, and two keyword angles instead of one. Going beyond three pins per post usually just splits your own impressions without adding reach.
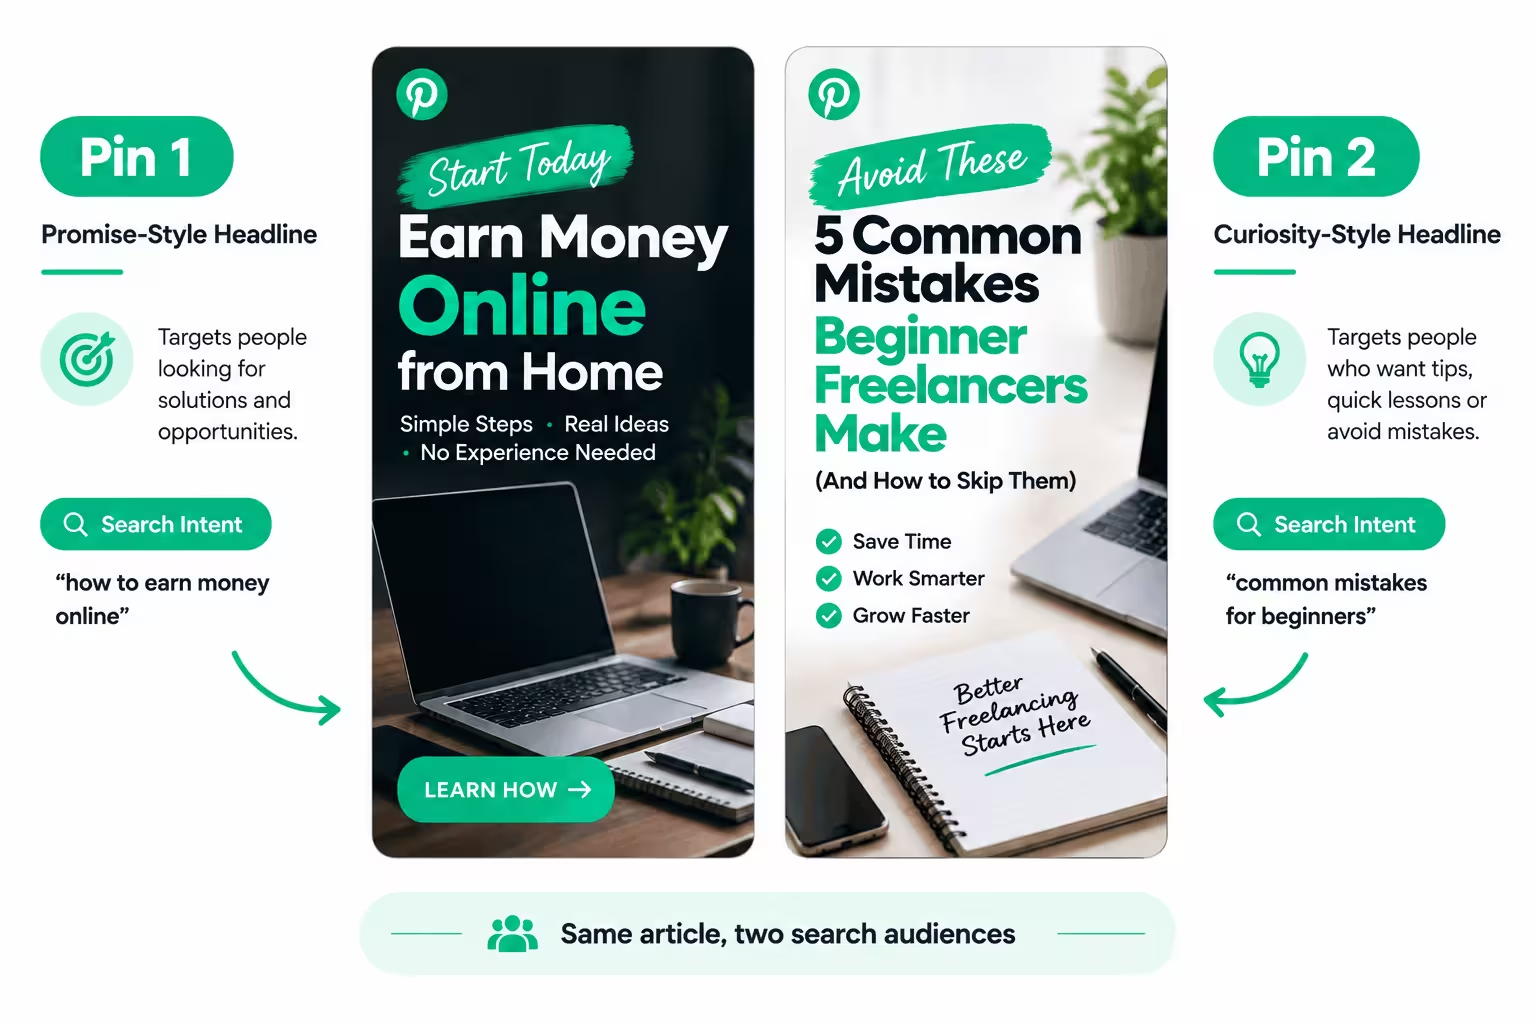
The two pins should differ in angle, not just color:
- Pin 1, the promise angle. The headline states the outcome or answer the post delivers. "How to Earn Your First $100 Online in Pakistan" for a freelancing guide.
- Pin 2, the curiosity or listicle angle. Pull a different hook from the same post. "7 Beginner Mistakes That Kill Your First Freelancing Gig" targets people searching for mistakes and warnings, a completely different search audience, same article.
Design both at 1000 x 1500 pixels, the 2:3 ratio Pinterest recommends. You can push to 1080 x 1920 for extra height, but never taller than a 1:2.1 ratio or Pinterest crops your pin in the feed.
Step 4: Pin Design Rules, Including the Text-to-Image Ratio
This is the part most guides wave past with "make it pretty," so let me be specific. A pin is viewed at thumbnail size on a phone, in a feed of competing pins. It has about one second to win the click. Every design choice serves that one second.
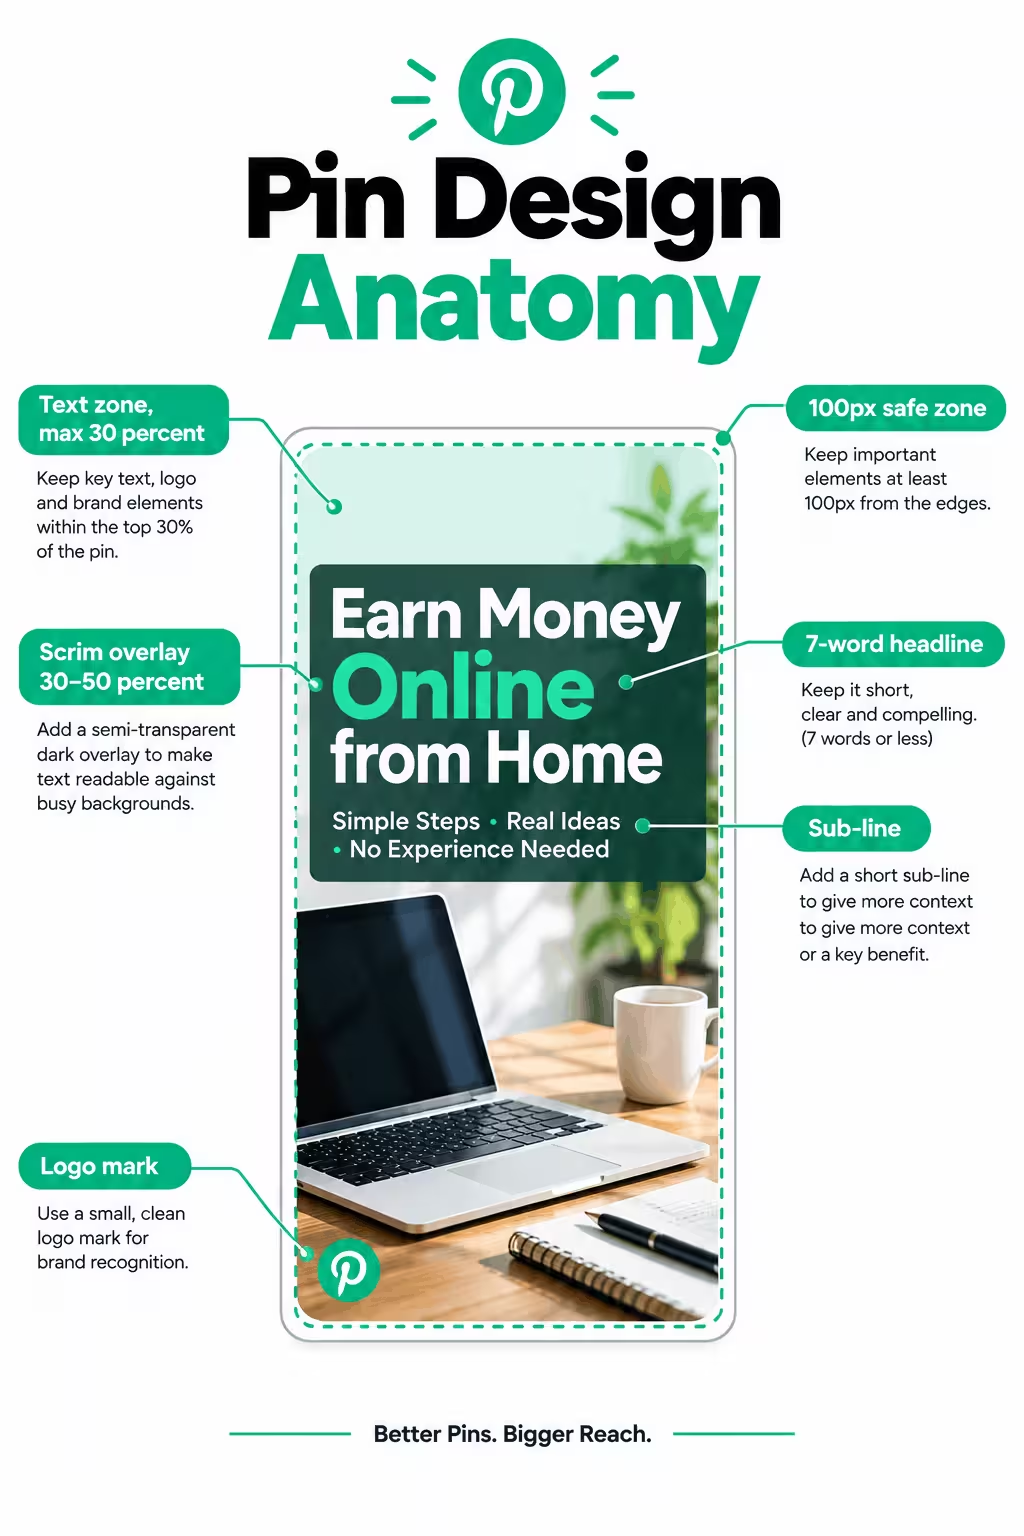
The text-to-image ratio: keep text under 30 percent of the pin area. If your words cover most of the image, Pinterest treats it as low quality and users scroll past it. The image should do the attracting; the text should do the explaining. One headline, one short sub-line, your brand mark. That is the full text budget.
Headline rules. Six to eight words maximum. Big, bold, readable at thumbnail size. Test it yourself: shrink your design to the size of a postage stamp on your phone. If you cannot read the headline instantly, the font is too small or the background is too busy.
The visual formula that works:
- A background photo or pattern that matches the post topic. Your blog's featured image works, or a clean stock photo. Avoid cluttered backgrounds.
- A dark or light overlay, called a scrim, at 30 to 50 percent opacity behind the text. This is the difference between text that pops and text that fights the photo.
- The headline in your brand font, large and centered or left-aligned.
- One sub-line in a smaller font: a number, a benefit, or a curiosity gap. "Free checklist inside" or "No investment needed."
- Your logo or site name, small, in one corner. Every pin is a brand impression even when it does not get clicked.
Fonts and colors. Two fonts maximum, the same two on every pin. Use your brand colors so your pins become recognizable in the feed. Consistency is a ranking-adjacent signal: when users recognize and save your style repeatedly, Pinterest shows your pins to more people.
Safe zones. Keep all text at least 100 pixels away from the edges. Pinterest rounds corners and overlays interface elements, and text near the edge gets clipped on some devices.
What to avoid. All-text pins with no image, tiny script fonts, more than 8 words in the headline, clickbait headlines that the article does not deliver (Pinterest suppresses mismatched pins, and the "visit site" button can stop appearing on them), and watermarks from free tools plastered across the middle.
Step 5: Write the Pin Title (The Formula)
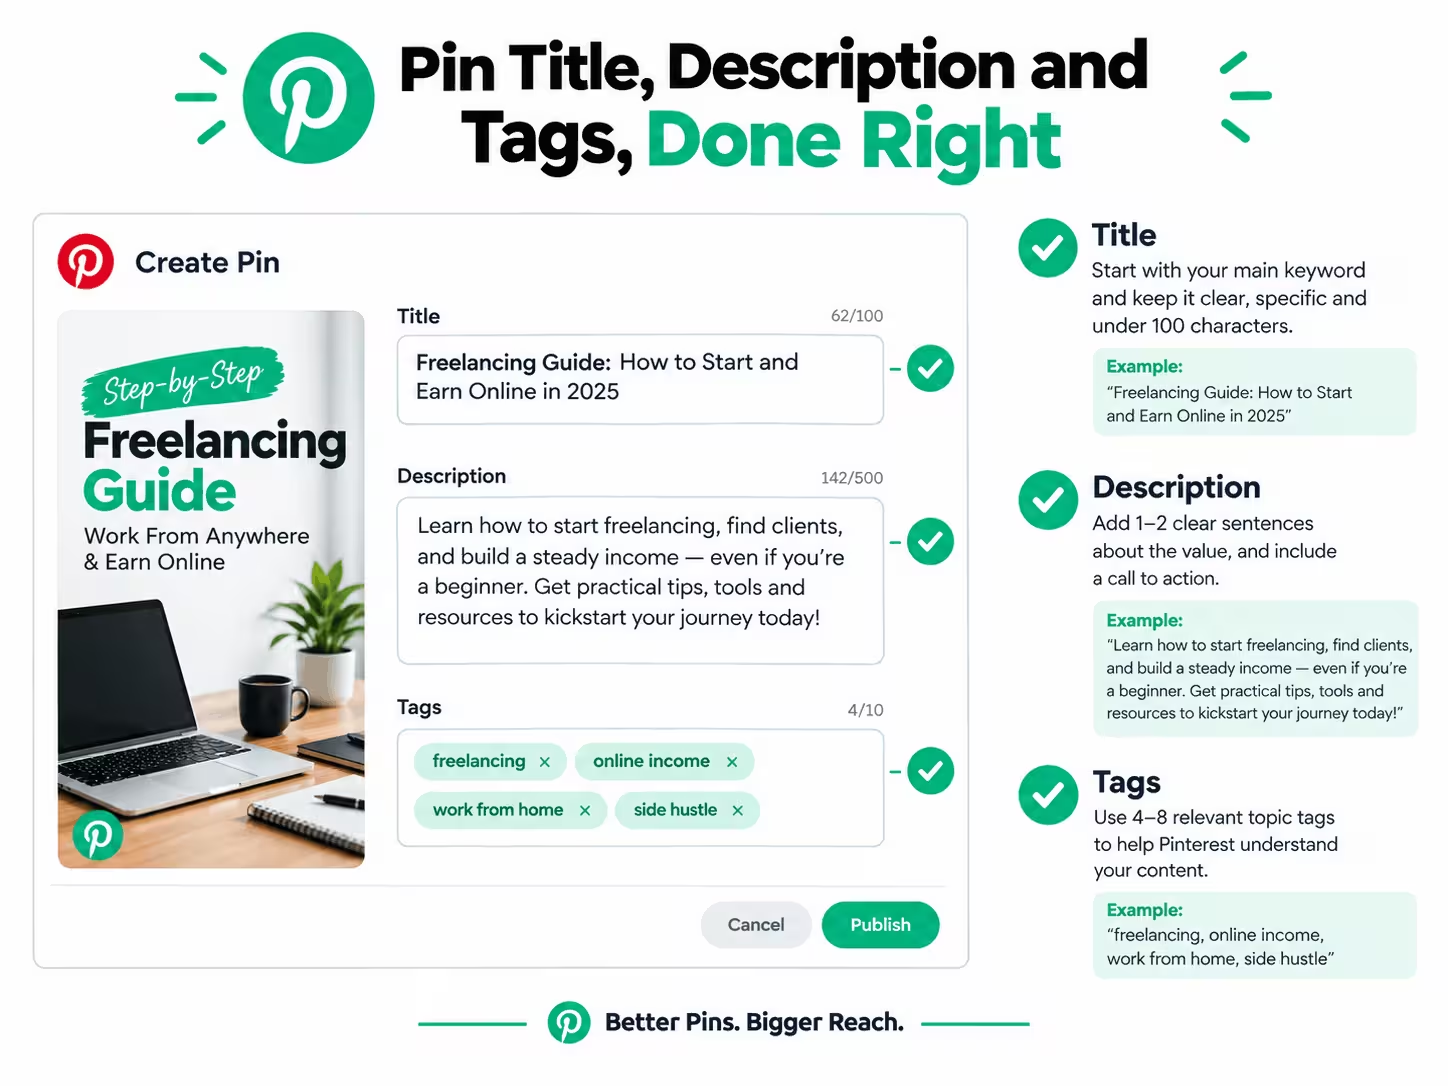
The pin title is a search field, not a caption. Pinterest gives you up to 100 characters. Use this formula:
[Main keyword] + [specific benefit or angle], with the keyword inside the first 40 characters.
- Good: "Pinterest Blogging: Turn Every Blog Post Into Traffic"
- Weak: "My new blog post is finally here, check it out"
Write a different title for each of your two pins, each targeting one of the keyword angles you found in Step 1. Pin 1 targets the main keyword. Pin 2 targets the secondary angle, like the mistakes or listicle phrasing. Two pins, two search queries, one article.
Step 6: Write the Pin Description (And Use Tags Properly)
The description is where most bloggers leave traffic on the table. They paste the blog intro or leave it blank. Instead, write 100 to 300 characters that do three jobs: tell Pinterest what the pin is about, tell the reader why to click, and end with a call to action.
The structure:
- First sentence: restate the promise with your main keyword, naturally. "Learn Pinterest blogging step by step: how to turn every blog post into multiple traffic-driving pins."
- Second sentence: name 2 to 3 specific things the reader will find inside. "Includes board strategy, pin design rules, title formulas, and the exact tools I use."
- Call to action: "Read the full guide on the blog" or "Save this pin for your next blog post."
Use your keyword 2 to 3 times total, worked into real sentences. Never stuff: "pinterest blogging, pinterest for bloggers, blogging pinterest tips" reads as spam to both users and the algorithm, and it can suppress the pin.
Then add topic tags: 3 to 5 relevant tags per pin, no more. Tags are Pinterest's own categorization labels, separate from hashtags. Pick tags that describe the pin's topic precisely, like "blogging tips," "Pinterest marketing," "blog traffic." Irrelevant trending tags hurt more than they help, because they attract the wrong audience who will not click or save.
Step 7: The Link Strategy (Where the Traffic Actually Comes From)
A beautiful pin with a broken or untracked link is wasted work. Handle links like this:
- Always use the full URL. Never use shortened links. Pinterest often fails to resolve shorteners correctly, and they look untrustworthy to users.
- Add UTM parameters so you can see Pinterest traffic separately in your analytics:
?utm_source=pinterest&utm_medium=pin&utm_campaign=post-slug. One campaign name per post keeps your reports clean. - Test the link before publishing. Click it from the pin preview and confirm it lands on the right article, not the homepage, not a 404.
- Protect old pins with redirects. Pins circulate for years. If you ever change a post's URL or category, set up a redirect to the new address, never just to the homepage. A viral pin pointing at a 404 is traffic you paid for with effort and then threw away.
- Keep pin and page matched. The pin's headline must honestly describe the article. When pins mislead, Pinterest can hide the "visit site" button, which quietly kills your click-through rate. Check your top pins a few times a year and fix anything that drifted.
If your blog runs WordPress, enable article rich pins by validating your site in Pinterest's rich pin validator once. Rich pins pull your headline and description automatically, which makes every pin look more complete with zero extra work per post.
Step 8: Publish on a Schedule (The 14-Day Pin Cycle)
Timing matters less than consistency, but a new post deserves a deliberate rollout. Here is the cycle I use for every article:
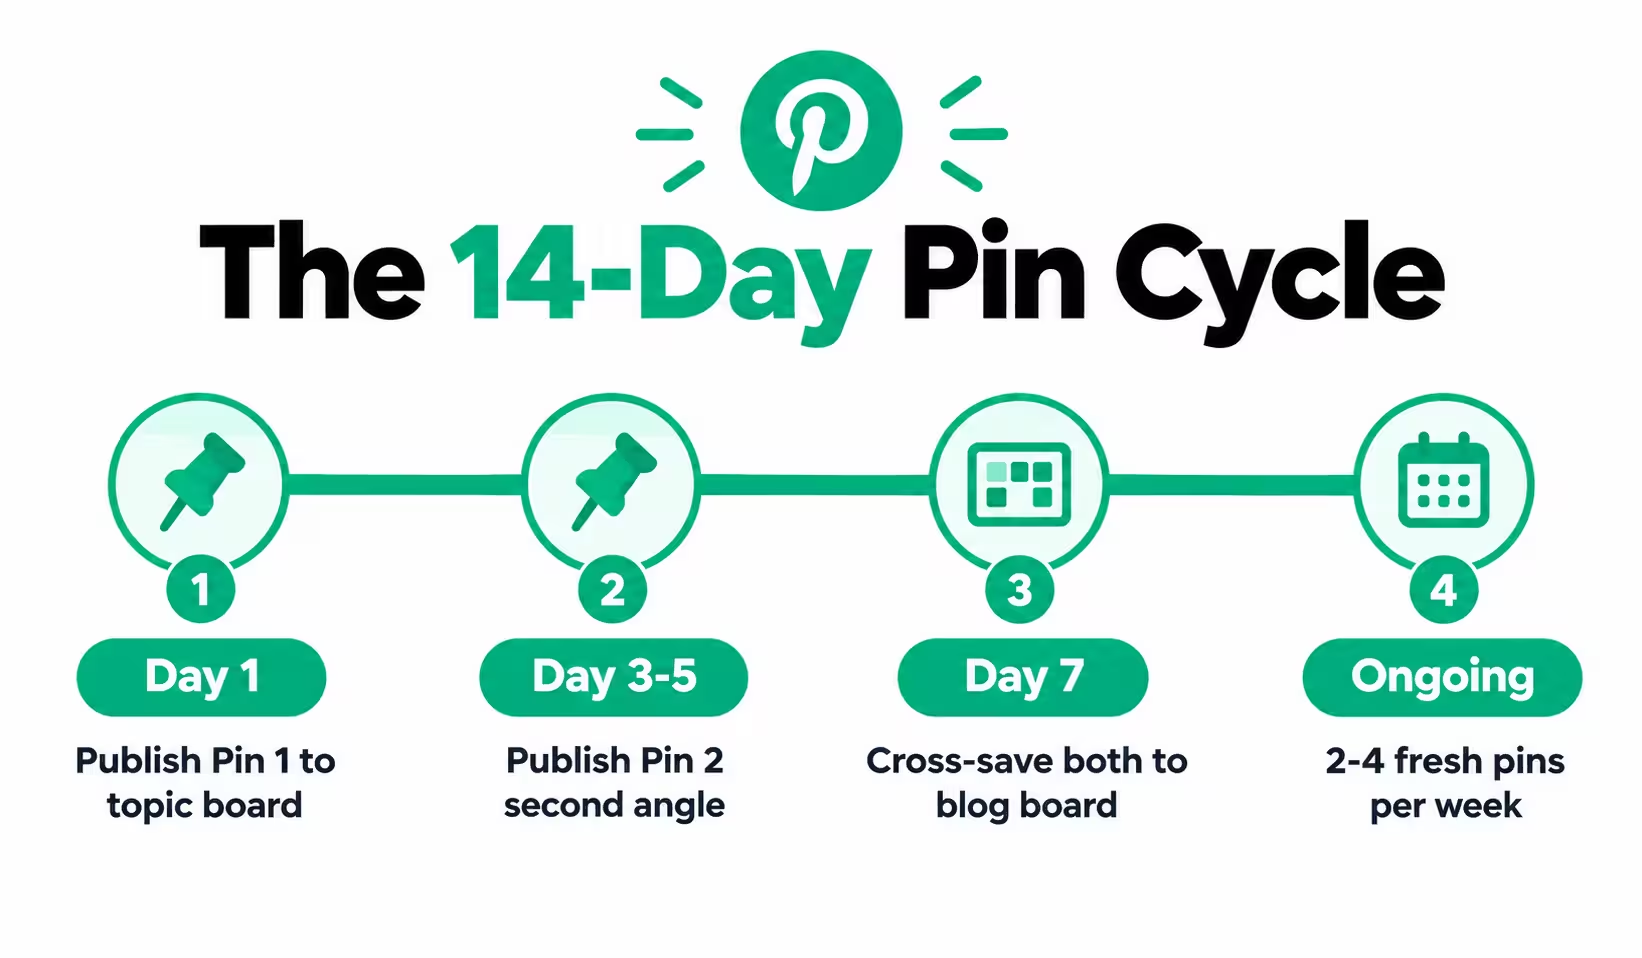
- Day 1: Publish Pin 1 to the most relevant topic board. Share the post link on your other channels the same day so the article gets early engagement.
- Day 3 to 5: Publish Pin 2, the second angle, to the same topic board. Spacing the two pins avoids looking spammy and gives each pin its own window in the feed.
- Day 7: Cross-save both pins to your blog board.
- Ongoing: 2 to 4 fresh pins per week across your account is a healthy pace for a growing blog. Pinterest's own scheduler lets you queue pins up to 30 days ahead on mobile and 14 days on desktop, up to 100 scheduled pins, so you can batch a month of pinning in one sitting.
Resist the urge to dump all pins on day one. Fresh pins spaced out get individual algorithmic attention. Five pins at once get treated as one burst.
Step 9: The Tools That Make This Fast (Canva, AI, and WordPress)
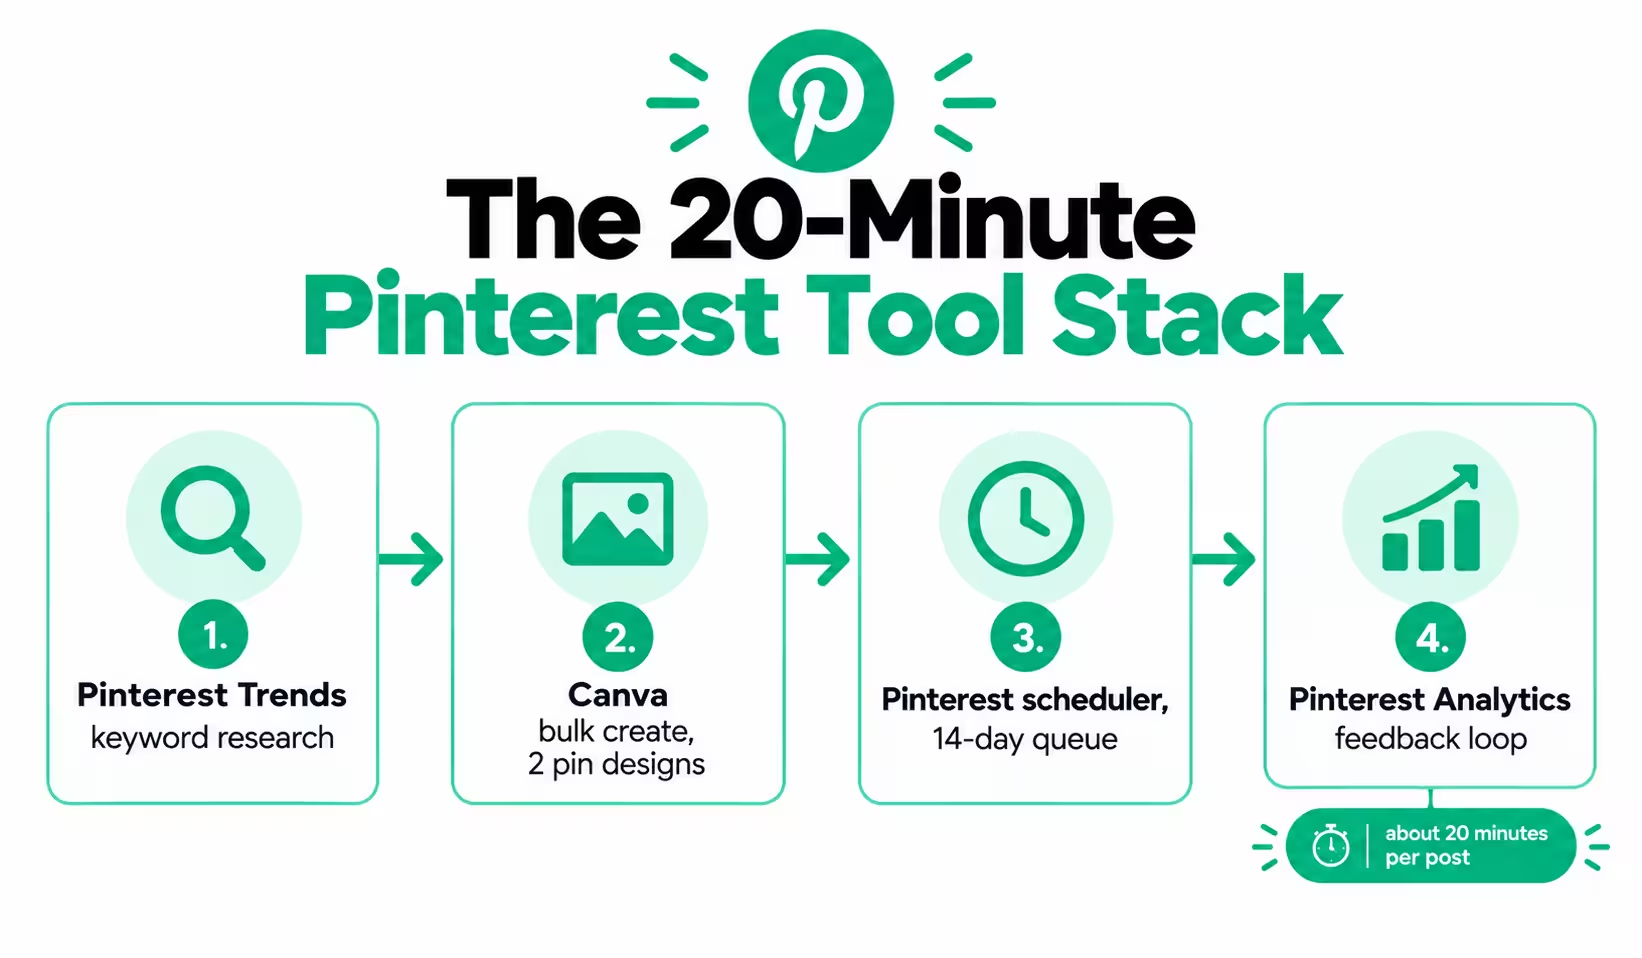
Doing the above manually for every post would take hours. The right tool stack brings it down to about 20 minutes per post.
Canva for pin images. Build one master pin template in your brand fonts and colors, then duplicate it for each post. Change the background, headline, and sub-line. Canva's bulk create feature can generate both pin variants from a spreadsheet of headlines in one go. Save every finished pin at 1000 x 1500. If you ever outgrow the free plan, the background remover and brand kit alone are worth it for pin production speed.
AI tools for titles and descriptions. After keyword research, ask an AI assistant to generate 10 title variations from your two keyword angles, then pick the two strongest and rewrite them in your own voice. Use it for description drafts the same way. AI is the intern that drafts, you are the editor that ships. Never publish AI text untouched; Pinterest descriptions written by unedited AI all sound the same, and same-sounding pins do not stand out in a feed.
WordPress plugins for the blog side. Install a social sharing plugin that shows a "Pin it" button when readers hover over your images, one click saving for them means free distribution by your own readers. Use your SEO plugin to claim your site on Pinterest and enable rich pins. If you publish often, an RSS-to-Pinterest auto-pinning tool can push each new post's featured image as a draft pin automatically, which you then rewrite with a proper title and description instead of publishing as-is.
Pinterest's own free tools. Pinterest Trends for keyword timing, the search bar suggestions for keyword discovery, the bulk uploader for batch publishing, and Pinterest Analytics for the feedback loop. All free, all underused.
Step 10: Measure, Then Double Down
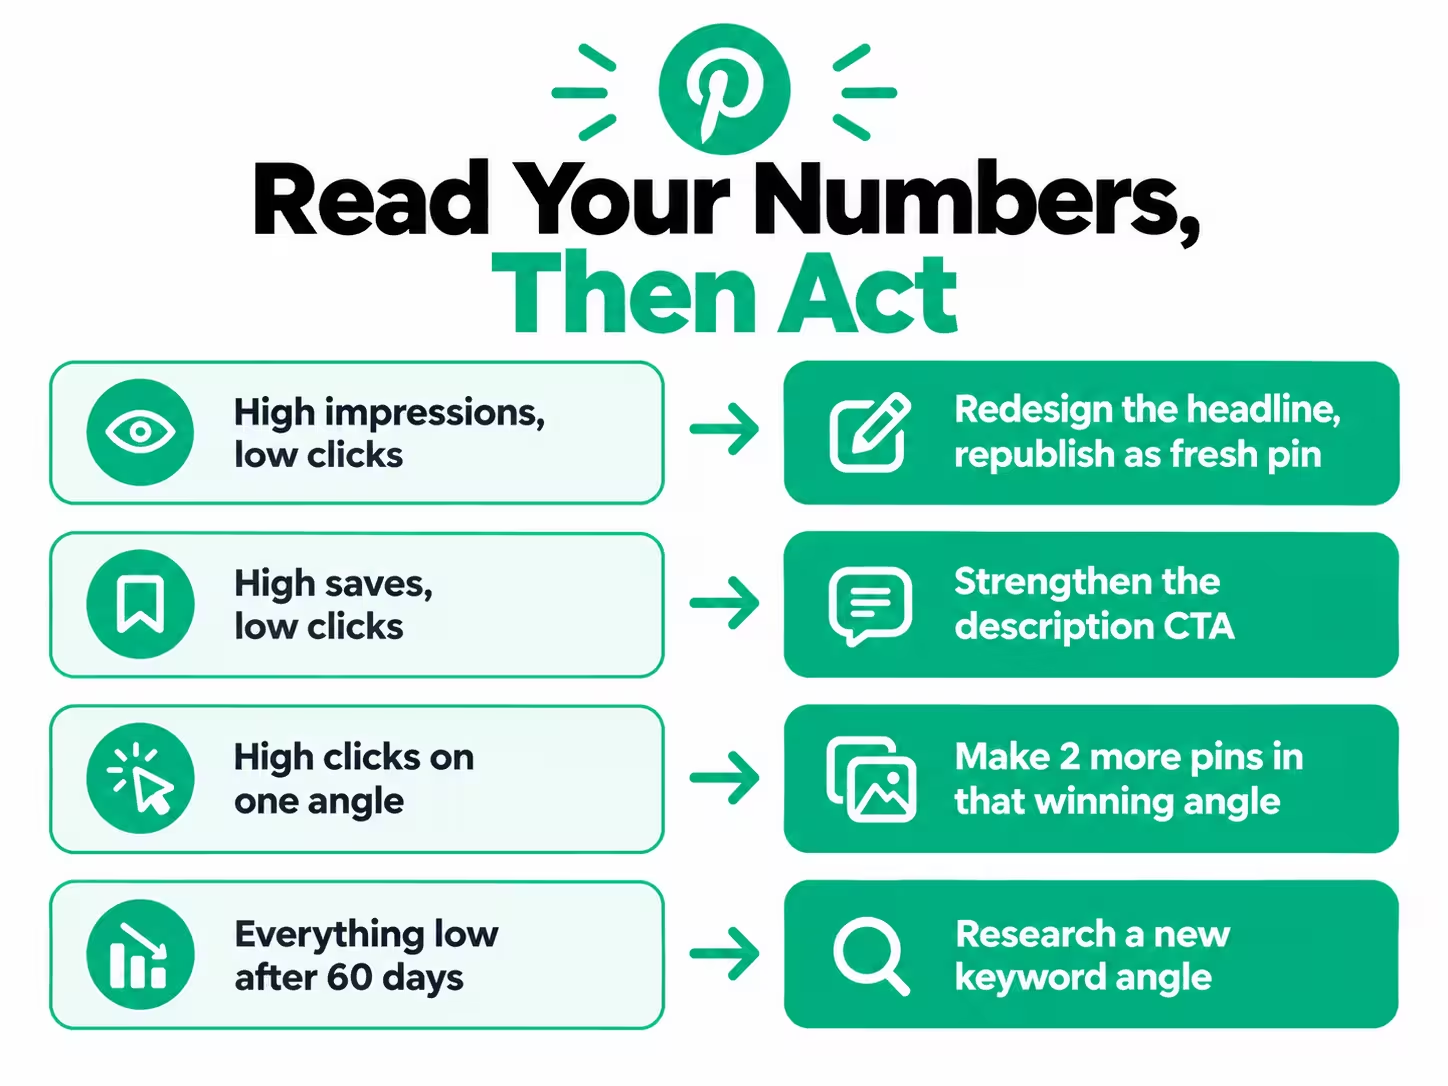
After 30 days, open Pinterest Analytics and look at three numbers per pin: impressions (how often it was shown), saves (how often people kept it), and outbound clicks (how often people visited your blog). The pattern tells you what to do next:
- High impressions, low clicks: the design or headline is not converting. Redesign the pin with a stronger headline and republish as a fresh pin.
- High saves, low clicks: people love the idea but the call to action is weak. Strengthen the description's CTA.
- High clicks on one angle: make two more fresh pins in that winning angle for the same post. Winners deserve reinforcements.
- Everything low after 60 days: the keyword angle has no demand. Research a new angle from search suggestions and try one fresh pin before giving up on the post.
This loop is the real secret of Pinterest blogging. The bloggers winning on Pinterest are not better designers. They are better at reading the numbers and iterating.
7 Mistakes That Kill Pinterest Blogging
- One pin per post. You get one lottery ticket instead of two or three, and Pinterest explicitly rewards fresh pins.
- A board for every post. Forty thin boards signal nothing. Topic boards plus one blog board signal expertise.
- Keyword-stuffed descriptions. Reads as spam, suppresses reach. Two to three natural mentions is the limit.
- Text covering the whole image. Keep text under 30 percent of the pin area or watch your impressions flatline.
- Shortened or untested links. One broken link on a viral pin can cost you thousands of visits.
- Pinning only your own content, all at once. Space pins out, and mix in a few genuinely useful pins from others in your niche. Accounts that only self-promote in bursts look like spam operations.
- Never checking analytics. Publishing pins without reading the numbers is like blogging without checking traffic. The data tells you which angle to repeat.
What You Should Know
Pinterest blogging is not a side task you do after publishing. It is the second half of publishing. The bloggers who treat every post as raw material for two search-optimized pins, filed in the right boards, with tracked links and honest headlines, build a traffic source that compounds while they sleep. The ones who pin once and hope, stay invisible.
Pick your next blog post, run it through this system end to end, and watch what happens over the next 30 days. Then do it for every post after that. That is the whole secret. There is no other one.
Frequently Asked Questions
How many pins should I create per blog post?
Two is the sweet spot for most posts. Each pin should be a fresh image with a different headline angle and keyword target, both linking to the same article. For long, rich posts you can stretch to three, but never publish them all on the same day.
Do I need a business account for Pinterest blogging?
Yes. A business account is free, it is required by Pinterest's terms if you promote a brand or blog, and it unlocks analytics, rich pins, website claiming, and the native scheduler. Convert your personal account or create a new one, then claim your website.
What size should Pinterest pins be?
1000 x 1500 pixels, a 2:3 ratio. That is Pinterest's official recommendation. Taller pins up to 1080 x 1920 work, but anything taller gets cropped in the feed.
How long does it take to get traffic from Pinterest?
Faster than Google SEO, slower than a viral short. Most bloggers see the first meaningful clicks within 2 to 6 weeks of consistent pinning, and pins keep compounding for months. The bloggers who quit at week three never see the curve bend.
Can Pinterest blogging work for non-visual niches?
Yes. Finance, blogging advice, online earning, and tech blogs all grow on Pinterest. The pin image carries the visual weight, not the topic. A strong headline on a clean design works in any niche because Pinterest users search for solutions, not just pretty pictures.
Should I use hashtags or topic tags on pins?
Use Pinterest's topic tags, 3 to 5 per pin, chosen for relevance. Skip hashtag stuffing in the description. A few precise tags beat twenty generic ones.
Share this article
Link copied to clipboard!